By Daniel Guedes, Software Developer at Arionkoder.
Managing state inside an application can become a very hard task, depending on the complexity of your system. Sometimes we may find ourselves in a scenario where asynchronous events depend on other events with complex rules that drive how the application should behave. A change in one component triggers changes to other components due to variables that depend on the input.
In this kind of situation, it may be interesting to apply the Observer design pattern. Taking the definition from the design patterns book, we have the following definition:
A one-to-many dependency between objects so that when one object changes state, all its dependents are notified and updated automatically.
Usually, the Object which will “transmit” the changes is called a Subject/Observable and the objects that will be notified are called Observers.

Building a simple VanillaJS Subject/Observable
To better understand the applications of this behavioral pattern, first, we must understand how it works. For that, we’ll create a simple Subject class that will encapsulate our logic. We’ll use some common terms used across multiple implementations of this pattern:
- To pass a value that will be broadcasted to all of our observers, we’ll use the next method, passing the value to it;
- To create an observer that will listen to our changes, we’ll use the subscribe method, passing the observer to it;
- To remove an observer, making it so that it does not listen to our Subject changes anymore, we’ll call the unsubscribe method passing this observer;
And with that, we have the basic structure for our Subject. In this scenario, and also in other common use cases of this pattern in javascript, the Subject is implemented as a class and the observers are implemented as functions. This implementation gives a lot of flexibility to the observers since as functions they can operate the values in many ways, and do not rely on a previous implementation.
Below we have an example with a Subject and the observers thought of as mathematical functions:
Opening the console for this snippet, we can see the core of the Observer pattern: the main Object, in this situation the number$ variable, can subscribe to multiple variables, and then send a next call to broadcast values to all subscribed variables.
Now it’s time to do a more complex implementation using RxJS.
Adding power with RXjs
Being a complex and much-used pattern, there is a library that has sets of operations and helper methods to deal with observables in javascript, RxJS. In typical day-to-day use cases of the observer design pattern, you may find yourself interacting with this library.
Let’s take this example and supercharge it using RxJS. We’ll create User posts UI, but using a lot of features that RxJS offers.
Creating our API
To create our API, we’ll use this public endpoint. We’ll use the posts, user, and comments endpoints. For this, we’ll use a structure similar to other social media, where each post has information about the user, the post itself, and its comments. This will allow us to create a more complex example, where we can use a lot of operators and deal with observables of observables, or higher order observables.
Using the from method, we can create an observable source from many usual sources, such as arrays or promises.
Now that we have our API, let’s create our input observable and our posts observable
Creating the input observable
So, to create a variable state in the application, we’ll want to vary our userID using a simple numeric input. This input must have some sort of debouncing and also a range limit, having valid values between 1 and 10. How can we do that using RxJS?
Using the fromEvent method, we can pass to it an HTML element and the event name and it’ll return an observable that emits a value according to that event. So let’s use our input element and the input event, that will fire with every user input in the element.
From that, we can use the pipe operator and RxJS operator functions to help us achieve our final observable. Think of the pipe operator as a pipe to the values that the observable emits, and each method inserted in the pipe will change the data and pass it forward, like gadgets and water valves that will change the properties of the water that is flowing in the pipe, each doing a different thing to it.
Let’s take a look at each of the methods being used:
- The map method will work like the conventional array method, taking a value and returning something else. Here we’ll take the event and return an integer from the value;
- The filter method will work like the conventional array counterpart, only allowing values lower or equal to 10 to be emitted in the flow;
- The debounceTime method, will make it that if a value is emitted and another is emitted in less than 300ms values in between will be ignored, and only the last one after 300ms will be considered;
- Finally, startWith will make it so that the initial value before any emission is 1;
With that, we have our final pipeline result. Each time a user triggers the input event, we’ll get a number between 1 and 10, ignoring all other numbers.
Creating the posts observable
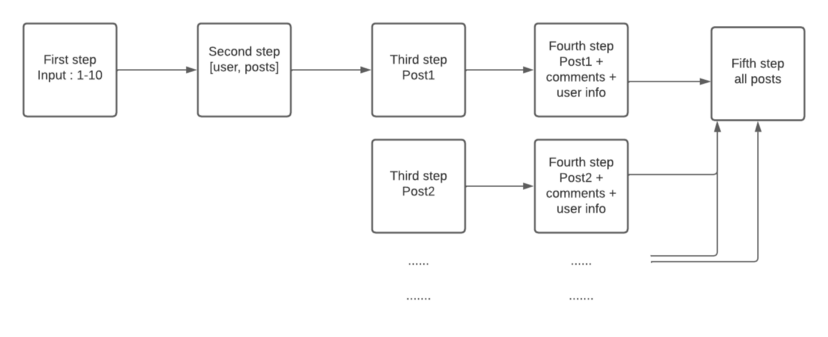
Now with the posts, we’ll have the most complex part of the project. We need to get the user and the posts for that user. After that, with each post, we’ll need to get the comments to that post, and then wrap all stuff together.
As a backend solution, this wouldn’t be very hard to do, since different DB libraries and paradigms already support that grouping of related data together, but doing this in the frontend can be hard, considering that we also need to group that together with our user input logic.
- First, we’ll connect our input Observable, and we’ll call the switchMap operator. This operator takes an observable and automatically subscribes to it returns the result. More details on this pattern can be found here;
- The observable that will feed the switchMap method is built using the zip helper function, which takes n observables and returns an observable that emits an array of the responses after everything completes;
- After that, we’ll have an array that should return our user info and the corresponding posts for that user, but we still have to fetch comments for each post and append them;
Now bear with me, this may get a little complicated:
- First, we’ll feed a switchMap with an observable stream created for our posts, so each post will be a value emitted from the observable;
- After that, we’ll use mergeMap on each post coming from that observable. MergeMap will make it so we don’t have to wait for the previous observable to complete to start the next one. This is important here because we don’t need to wait for each post before getting the next one, we only care when all posts are complete;
- This mergeMap will get the comments, and after we get them, we just map all values together, creating our output object;
- After that, we have the toArray method. This method will group all values emitted by the observable back together into an array;
- After that it’s just a matter of populating the UI with our values, we can do that with template strings and a tap method, to do this side effect;
The final result can be seen below:
And also, see how the information changes for each step:
Wrap Up
Using Observables and the observer design pattern can be a game-changer in simplifying state management. As with all other design patterns and architecture choices, its use is not a silver bullet, but a trade-off.
Observables are best used in scenarios with a one-to-many relation and complex data flow. They add more boilerplate code to an application, which is not always worth it.
For example, when building a frontend with complex pagination, filters, search, and other async interactions, using observables to handle these events and triggering the necessary changes makes state more predictable, and easier to manage.
Transforming a simple HTTP login call into an observable will feel like overwork when a simple method could handle the logic.
The key is to evaluate trade-offs inside your application and follow from that. Use with care.
Disclaimer
This example with the posts got a little too complicated, using observables of observables and other concepts that would be too much for this article. There is a way to simplify the complexity using Subjects, that I’ll leave for an article.